The Refinishing Process:
Job evaluation
No two floors require the exact same procedure to refinish, but in general the steps are largely the same. Before I arrive, possessions should be moved out of the rooms that are going to be refinished. Once the floor is exposed I can assess the condition of the wood and whether there are any deficiencies that should be addressed. For example, do I need to patch-in any missing areas of flooring, or refasten any loose or squeaky boards? But one of the best things about wood floors is that they are very resilient and most old floors don't need any repairs at all. It is at this time that we will discuss scheduling and what you can expect out of your newly refinished hardwood floor.
Prep
When I arrive at the scheduled date and time, I will begin by doing any preparation work, such as removing quarterround moulding and any doors that will impede the sanding process. Then I will load in the sanding machines. Usually the floors should be swept and vacuumed before sanding begins, as small pieces of rock or metal debris can adversely effect the sanding machines as well as the floor. Although my dust containment practices are very good, I will hang plastic to protect any occupied spaces. I will need access to a power source that supplies 220v electricity, which usually means I need to tap into the outlet for an electric stove or go down in the basement to wire into the main electrical panel.
The Machines


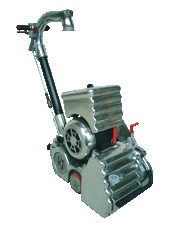
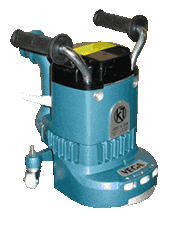
There are two main sanding machines, the big 220v belt sander (the "big machine") and the edger. The big machine is big--200lbs, and I use it to sand about 90% of the floor. But, because of its size and the way it spins the sandpaper, it can't sand very close to the walls or in tight spaces. For that I need the edger, which operates much like a large drill on wheels--it uses a 7" sandpaper disc that it spins at a very high speed. Both of these machines are very powerful and, in inexperienced hands, are capable of quickly ruining a floor. It takes years of practice to master their operation. In addition to these, I use a 16" buffer, various hand sanders, and a vacuum.
Sanding schedule
I start sanding with the big machine with a 36 grit belt. It is coarse enough to sand off the previous layers of finish and the coloration they have imbued in the wood, but not so coarse as to remove an unnecessary amount of the wood below. I walk the machine back and forth, very carefully raising and lowering the sanding drum to leave avoid leaving unsightly "drum marks." I generally sand one side of the room 2/3rds of the room depth, then turn around and sand the other 1/3rd of the room--staggering where I raise the drum each time so as not to create a line down the middle of the room. It is good practice to run the machine at a slight angle to the direction of the floor boards in order flatten out any height differences in floor.
After the first cut with the big machine, I will switch over to using the edger to hit all the areas I could not reach with the big machine. I start with 36 grit on the edger as well, for my comfort I sit on a small rolling chair and make my way around the perimeter of the room, sanding all the edges and any closets or nooks. I am very careful not to damage any of the door casing or baseboard with the edger. The edger has its own dust bag, but I find that hooking a vacuum up the the edger provides much better dust collection.
After the first cut with the edger is complete, I switch back to the big machine to make another pass, this time using 50 grit belts. On this pass I sand with the direction of the flooring, because it has been leveled already, and I am now trying to remove the deep scratches left from the first pass.
After the second cut with the big machine is done, I switch to the edger again to do a second pass using 80 or 100 grit discs. This cut is very important, and I take my time to do it right. My preferred method is to wait until dark and shine a flashlight across the area that I am working on to make sure that I leave a smooth surface with no digs, gouges, or swirls.
After the second/final cut with the edger, I do the last pass with the big machine using 80 grit. This cut leaves a smooth, and scratch free surface. I do this after the last pass with the edger in order to more easily clean up as much of the edger scratches as I can. What I can't get with the big machine I will have to get with a powerful 6" random orbital sander.
After the third/final cut with the big machine, I disassemble it and take it and the edger out of the house. Then I begin working on the areas that even the edger couldn't reach, which are corners and around door frames. These parts get done by hand with a carbide scraper and a square orbital sander.
After all the corners are done, I sand around the perimeter of the room with the 6" random orbital sander with 60 grit paper and make sure that everything looks good. I blend the line between where the big machine and the edger overlapped, I make sure that no edger swirls remain, and I level out any remaining heigth differences that will become very obvious once the finish goes on.
After the hand sanding, I usually buff the floor using a 16" sanding screens. For most woods I will buff the entire floor twice with an 80 grit screen, and once with a 120 grit screen. I use dust collection with the buffer for this process--which is essential.
Prepping to coat
After buffing, I thoroughly vacuum all surfaces. I start by using a broom to sweep the walls where any dust may have collected due to static electricity. Then I vacuum the tops of windows and door casings, the top of the baseboard, window sills, and doors. Finally, I tack the floor with a cloth moistened with denatured alcohol to pickup any remaining dust or particulates that could get trapped in the finish.
Coating
My preferred system is to first seal the wood with shellac, then apply two coats of waterbourne polyurethane. Shellac is perhaps the world's oldest wood finish, it is an all-natural (and edible) product that accentuates the natural beauty of the floor by giving it a "wet" look. The only way I've found to apply shellac evenly is to use a block brush on your hands and knees. One of the virtues of shellac is that it dries very quickly--within 30 minutes I can be back on the floor to do the first coat of polyurethane. There are many different brands of professional floor finish and I have tried more than a few of them. I prefer to use Pallman finishes, which are a more obscure European finish. Their products look great, lay out flat, have excellent wear resistence, and they are relatively inexpensive.
I apply the polyurethane by pouring it out on the floor and strategically pushing it around with what is known as a t-bar--a fuzzy synthetic applicator on the end of a pole. Application technique is very important as mistakes will be very obvious in the light of day (for example, puddles, drips, missed spots, debris, streaks from disturbing partially-cured finish). Waterbourne polyurethane dries very quickly and I must move fast to keep a wet-edge and avoid having to rework any areas that have been coated as little as 10 minutes previous. After I am satisfied that the whole floor has been coated, I seal off the area and stay off the floor for at least 2 hours.
After the manufacturer's recommended cure time has elapsed I can get back on the floor to start prepping for the last coat. It is at this time that you and I should walk to floor to check for and fix any defects in the finish, and get your approval on the floor. Then I buff the floor with 220 grit sandpaper to give the floor a smoother texture and help the next coat to adhere. I then hand buff all corners and around door frames. Next, I am ready to vacuum, load out all the rest of the equipment, tack with water, and do the final coat. The wait time to get on the floor after the last coat is a little longer--more like 3 hours. After that my work is done.
You can start moving furniture back 24 hours after the last coat has gone down, but need to wait at least a week to lay down any area rugs.
You now have a beautifully rejuvinated floor that will not need to be refinished again for many years.
